
Max Lange Attack
This attack is yet another branch off of the Italian Game. From last week, this begins with 1 e4 e5 2 Nf3 Nc6 3 Bc4 Bc5. As a review, Evans Gambit from a few weeks ago is if 4 b4. Giuoco Piano from last week is in the case of 4 c3. This week, for the Max Lange Attack, we look at 4 d4.
Black usually responds in one of three ways. Seirawan explores the line 4 … exd4 5 0-0 Nf6 (why not 5 … d6?) 6 e5. This brings us to the following postion with black to move.

If black moves the knight, say to g4 here, white has an interesting opportunity to regain a pawn: 6 … Ng4 7 Bxf7+ Kxf7 8 Ng5+ Kg8 9 Qxg4 and the game is pretty even.

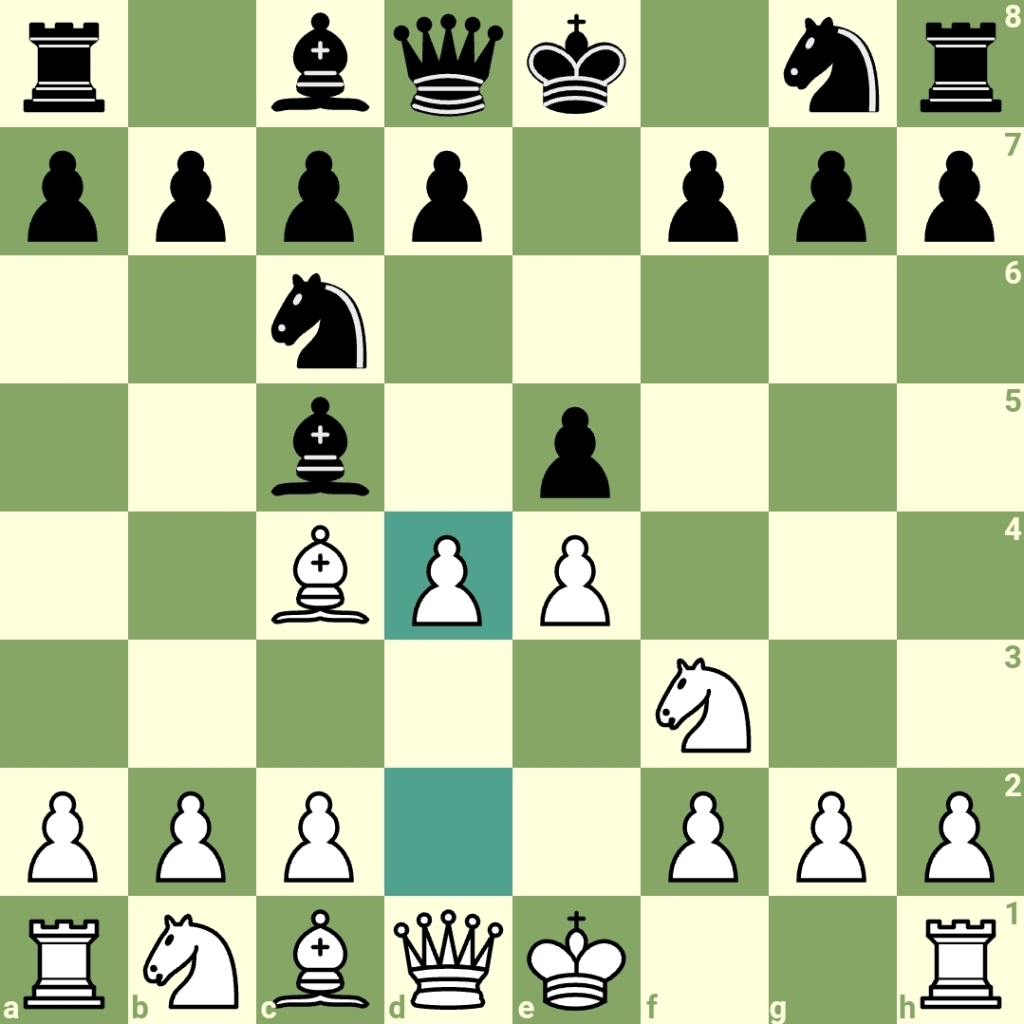
Instead, if we follow his main line: 6 … d5 7 exf6 dxc4 8 Re1+ Be6 9 Ng5, this brings us to the following postion.

Black’s best responses in this position are either 9… f6 or 9…Qd5. Let’s look at the mistakes 9 … Qxf6 or 9 … 0-0. The first will lose a bishop with 9 … Qxf6 10 Nxe6 fxe6 11 Qh5+ g6 12 Qxc5 while the second loses even more after 9 … 0-0 10 fxg7 Kxg7 11 Rxe6!, where white wins a bishop that black cannot afford to take without a queen-king fork by the knight.

There are definitely some mistakes that can be made by black with the Max Lange attack that are worth studying.
It’s actually quite simple
The following puzzle is taken again from 1001 Chess Exercises for Beginners by Franco Masetti & Roberto Messa. This one is puzzle 824. It is black to move and win.

If you need a hint, you’re looking for a move that will be a major threat that will soon end the game. The chess engine suggests that there is a mate in 7 for black in this position. Once you find the initial move for black, if you want a challenge, try and find how white can stretch the game out for 6 more moves.
The answer is 1 … Qh3. Since 2 Rxe2 leads to 2 … Qxf1#, white doesn’t want to take the rook with his rook. If 2 Rf2, then 2 … Rxf2 3 Rxe8+ Bf8 and nothing stop the inevitible Qxh2# in time.
How does white stretch it out? One way is 1 … Qh3 2. Qxe2 Rxe2 3 Rf2 Rxf2 4 Re8+ Bf8 5 Rxf8+ Kxf8 6 Bb4+ Ke8 7 a3 Qxh2#. White cannot do anything on the 7th move to stop Qxh2#.
The Philidor Position
Last week we looked at how to promote a pawn from the Lucena Position. This week we’ll look at the Philidor Position, one in which if you find yourself on the opposing side, you can easily force a draw. Let’s take a look at a classic position. All of this, BTW, is taken from Silman’s Complete Endgame Course.

If you put this into an engine, best moves will not always be the easiest to follow. Silman breaks the method down into a few simple steps. We first advance our rook to the row in front of the pawn to stop the enemy king from advancing in front of its pawn. This is what we want to avoid. While on this rank, you’ll move your rook back and forth until white gets bored and pushes the pawn.
At this point, advance the rook to the first rank with the idea of tormenting the enemy king with an endless supply of checks. This is how you draw the game.
I just finished a lengthy, boring game playing the level 8 Stockfish engine. The engine didn’t advance the pawn until the 50th move. I just hung out on the 6th rank moving the rook back and forth making sure it was safe from the enemy king and rook.
As Silman says, after mastering the Philidor Position, you should be able to draw any grandmaster that is playing white with ease.
